Alongside the steam engine, looms are one of the most important inventions in human history and were crucial to the development of the textile industry. Simple hand looms already existed in ancient times, but it was not until the industrial revolution in the 18th century that the loom experienced a transformative development. Edmund Cartwright’s mechanical loom from 1784 automated the weaving process and revolutionized textile production. This innovation made it possible to produce fabrics faster and on a larger scale, laying the foundations for modern mass production. Today, weaving machines are highly developed devices that have a significant impact on the global textile industry. significantly shape the global textile industry.
Looms can be extremely complex constructions, as there are countless design forms and construction types. Over centuries, the old designers have accumulated an enormous amount of know-how. Designing a fully automated machine using 3D printing is therefore an enormous challenge. Such a project requires months of designing, building and testing. I would like to realize this project in the future. For now, however, I have kept it a little simpler and designed a manual loom with eight shafts.
If you would like to build my loom, you will find everything you need here: Etsy or Cults3D
Don’t you have a 3D printer? Then you can get the complete machine as a kit with all the parts you need here: Etsy
There is an upgrade: weaving complex patterns requires a high level of concentration. The Dobby upgrade makes it possible to transfer the weaving pattern to a warp and then weave it without errors. It is highly recommended if you plan to weave longer sequences.
Here you can find the Dobby Upgrade: Etsy or Cults3D
I printed the loom with my Bambu Lab printers. Here you get a top price and support my work. Bambu Lab A1: A1 Bambu Lab X1C: X1C
Assembly and construction.
The construction of my loom consists almost 100% of 3D-printed parts. Only a few threaded rods and aluminum shafts are additionally required. You also need rubber cords, braided ropes, two ball bearings and various screws, nuts and washers. The assembly is explained in detail in the video and should be easy to carry out by anyone who can hold a screwdriver.
3D printed parts
The loom has eight shafts that are used to lift the individual pairs of ropes. This is done using levers on the top of the loom, which pull the ropes connected to the shafts upwards. This raises the respective shaft. Thanks to a rubber cord located on the underside of the shaft, the shaft springs back down by itself after the lever is operated. This design makes weaving very comfortable and quick. The rubber cords provide a pleasant resistance and allow the shafts to lock in the upper position.
Shaft lever with labeling
The reed is mounted on two ball bearings, making it particularly easy to attach the weft yarn. The warp beam and cloth beam are kept under tension by a ratchet, which keeps the warp threads taut and enables clean weaving.
My table loom is designed for a maximum weaving width of 280 mm, which is sufficient for a wide range of projects. It is advisable to label the dobby levers with the numbers 1 to 8 to ensure a quick and easy weaving process.
Reed
Reed with woven piece
Warping the yarn warp.
In order to thread the yarns into the loom neatly and orderly, it makes sense to warp a warp. If you do not have a warping board available, the easiest way to do this is with five screw clamps attached to a table.
Warping the chain with screw clamps
The screw clamps should be positioned so that the cords can be threaded to a length that corresponds exactly to the desired length of the weaving. A „guide“ can be used to indicate the exact length of the weaving. The length of the warp can be varied as required by adjusting the distances between the screw clamps.
It is particularly important to place three of the screw clamps in a line to form a so-called „crosshairs“. This involves winding the threads alternately above and below the clamps to form a cross. This thread cross separates each thread and makes it easier to thread them into the loom one after the other. It is essential to tie off this thread cross carefully so that it does not come loose. It is also advisable to tie off the warp at several points to prevent the threads from becoming tangled.
Crosshairs bounded
With this prepared warp, threading into the loom is considerably simplified and can be carried out without any problems.
Threading into the loom
To thread the warp into the loom, lay it across the loom and attach it to the warp beam. The threading comb is then fixed to the rear beam with rubber rings. This comb can be used to roughly pre-sort the threads so that they can later be neatly rolled onto the Warp Beam.
Threading comb
It is important to secure the crosshairs with two round rods. These round rods are attached to the loom using a rope, which stabilizes the crosshairs. Once this has been done, the binding cords can be removed as the crosshairs are now securely fixed.
Next, hold the warp threads with one hand and roll them onto the warp beam with the other. It is important to keep the strings under tension at all times. One hand pulls the threads while the other turns the warp beam. During the winding process, spacers, which can consist of simple cardboard strips for example, should always be inserted. These spacers ensure that the warp threads on the Warp Beam remain cleanly separated from each other and do not become tangled.
Winding the warp threads on the warp beam
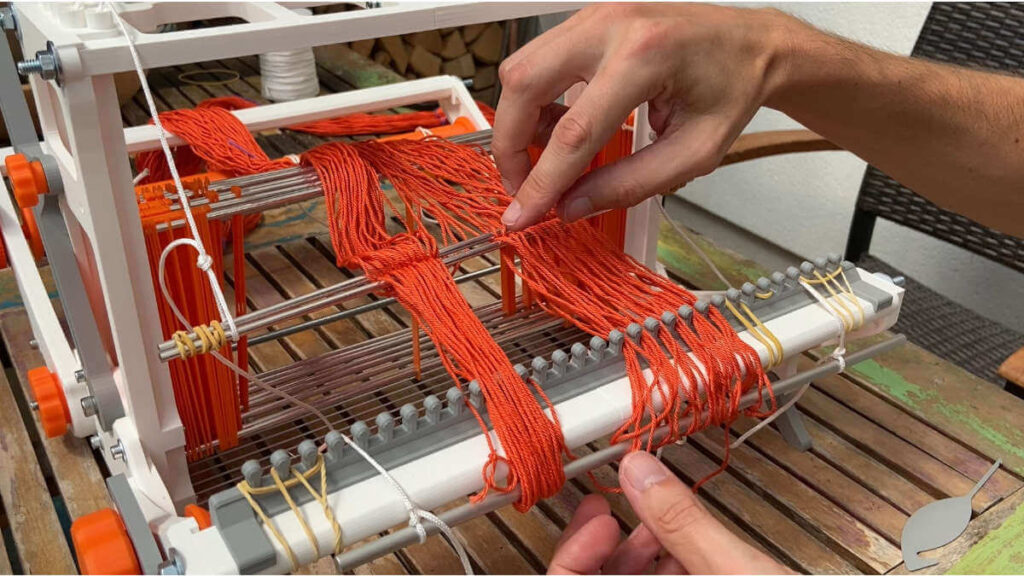
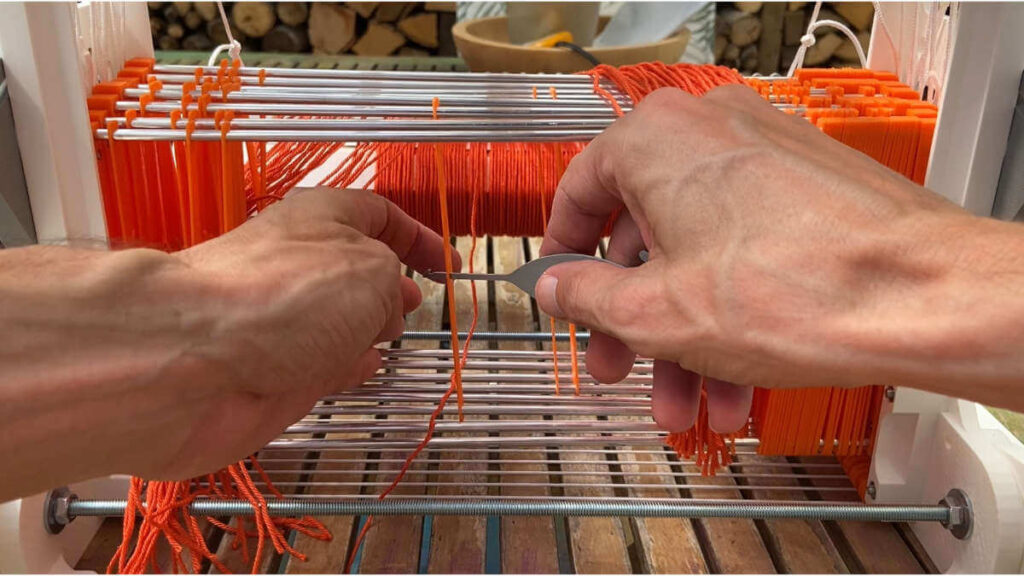
Now the warp threads must be threaded into the shafts. It is important to activate your gray matter and work with maximum concentration, as a mistake in this step can ruin the entire workpiece.
Depending on the desired weaving pattern, the warp threads are now threaded into the shafts in the correct order. To make this work easier, I have constructed a small tool that simplifies the process considerably. In addition, a so-called „weaving draft“ is required, which specifies the exact sequence of threading. I will explain exactly how this works below.
Threading the threads through the shafts
The crosshair that was created when warping the warp proves to be extremely useful for this work. It makes it possible to take the threads one after the other and thread them correctly. Once the warp threads have been threaded into the shafts, they must then be passed through the reed. It is advisable to thread the threads so that they are centered in relation to the loom to ensure even and stable weaving.
Threading through the reed with a tool
In the final step, the warp threads are knotted together in groups, for example in groups of five. This fixes the threads securely and the crosshair can now be removed as the threads are fully threaded and secured. These groups of threads are then attached to the Cloth Beam with a cord. The advantage of this method is that the individual groups can still be tightened if necessary. It is important to make sure that all warp threads are evenly tensioned to ensure an even weave.
Attaching the warp threads to the cloth beam
The loom is now ready for weaving. Although the whole procedure is quite time-consuming, it is essential to achieve a high-quality result. It is crucial to put effort into every step and work carefully to avoid mistakes.
Weaving draft and the weaving process
A weaving draft is a template that specifies the weaving pattern. It shows how the warp threads are to be threaded into the heald frames and in which order the heald frames are to be lifted. Weaving draft consist of four parts.
The top of the template shows how the warp threads must be threaded into the heald frames. The heald frames are marked with numbers and this pattern is repeated for all warp threads. It is relatively self-explanatory how the threads should be distributed according to the pattern.
The elongated field on the right of the picture shows the weaving sequence. You start at the top and work your way down row by row. This sequence determines which shafts have to be lifted in which step.
The central aspect of the weaving draft is the square field at the top right, which represents the so-called „connection“. Traditionally, this term is used for large looms with treadles, but here it is adapted for looms with levers.
Weaving cartridge with 4 areas
This is how it works: Start at row 1 in the web sequence (marked with the number 1). From there, go vertically upwards into the „connection“ field. Then follow the row to the left to see which shafts need to be lifted.
An example to illustrate this: If you are at number 4 in the weaving sequence, follow the red arrow upwards to the „connection“. Wherever there is a dot in this column, the respective shank is marked. In this example, heald frames 1, 2, 6 and 7 must be lifted. In the next step (no. 5) it would be shafts 1, 5, 7 and 8.
It makes sense to note this sequence of numbers on a piece of paper and then work through them one after the other. Over time, you will develop a routine and the weaving process will become increasingly faster and smoother.
There is a huge selection of pattern templates for web projects on Pinterest, from simple designs to complex and multi-colored patterns. Everyone will find something to suit their style or project.
However, if you want to create your own patterns, I recommend the Quickdraw software. This free software is relatively easy to use and has the advantage that you can see the resulting pattern in real time. This allows you to make adjustments and visualize the design directly to make sure it matches your vision.
Quickdraw Software
Weaving itself is now no longer a problem. The shuttle is wound in such a way that the thread forms a figure-eight shape. The shafts are then raised according to the weaving pattern. The shuttle is then pulled through the warp threads and the weft thread is struck with the reed. This sequence is repeated until the weaving is complete.
Winding the shuttle
Inserting the weft thread
Attaching the weft thread with the reed
Dobby Upgrade
Weaving complex patterns can be extremely challenging, especially when many different sequences are involved. I have therefore developed a dobby upgrade. This upgrade makes it possible to precisely mark a large number of sequences on a warp. As a result, it is now possible to weave even the most complex patterns without errors.
Here you can find my Video to the Dobby Upgrade: Youtube
Here you can find a great build report of the loom from someone else: strick17
And here are a few more impressions.
You can download the files here. You will receive – all required 3D files in .stl format – an overview drawing in .dxf and .pdf format – a parts page with links to the purchased parts
WHY??? Admittedly, the idea of constructing a cigarette stuffing machine may sound rather special. The inspiration for it came to me during my wanderings through…
I stumbled upon your YouTube video on 3D-printed table looms, suggested by Google on my home feed. I run a business calledHinkro Kente, a locally made bespoke kente weaving business in Ghana, I’m eager to modernize our production process.
Our traditional looms are bulky, occupying valuable space. As I plan to establish a weaving studio in Accra by end of 2024, I’m seeking innovative solutions. Your 3D-printed table loom caught my attention due to its compact size.
I’d love to discuss whether your design can accommodate the type of fabrics we produce. I’d appreciate the opportunity to share images of our traditional looms and explore the possibilities of your design.
Would you be available for a virtual meeting to discuss further?
Hello,
Unfortunately, I was unable to reply to your e-mail. The mail did not go out.
I am very pleased that you like the loom. I have had a look at your site and the type of fabric you make. There seems to be a long tradition of making this type of fabric. Do you have access to a 3D printer? I would suggest you build my loom and test if it is possible. I am planning an extension for the small loom. I want to build a kind of dobby loom. So the current loom should be able to be extended with a unit with which it is possible to weave more complex patterns using a program or punch card.
I think you would like that.
Kind regards
Franz
Hi Fraens. I have been looking forward to your email. I didn’t know you had responded to the comment. Sorry for the late response. However I am on whatsapp, you can send me a message at +233248167944.
Now to respond to your message, I do not have access to a 3d printer. I do not mind if you print the parts and ship to me here in Ghana. I have friends in Germany who can assist and ensure i get them.
I am also interested in your motorised / powered loom, If i get your last statement, you are producing a loom that can weave based on a command from a computer? that will be great.
I would definitely like that.
I wish we can communicate through any medium for prompt response. So let me know your preference.
Hello, I only sell digital files. Unfortunately I can’t supply you with a finished one. Sorry about that. Regarding a computerized loom, I have not yet constructed anything. Maybe this will be a project in the future. I have some ideas.
Yours sincerely
In that case, I will get the digital file, nevertheless I love the result of this particular loom as compared to the powered loom. However I think the powered loom would can be very handy. My humble request, can you engineer this into a powered loom for me?
Wanted to know if the file is idle for a standard 220 x 220 x 250 3D Printer. because it appears the vertical side panel and winding comb are way too big?
Printer guy says it still cant fit the printer area even when changed to diagonal. So if you can help in recommending on how to make it fit. If not kindly break the part into two so he print them separately and later join together.
Hello! I’ve just purchased and downloaded the files from Cults3D, but unfortunately I’m getting told that the Table Loom.zip file is invalid. It turned out it isn’t a zip file at all, but a 7z file. It would be helpful to mention that, or change the extension.
Hello Fraens, hope you good. Want to share the image of my loom with you and request some changes in the rod sizes that could be found at my locality. Also I don’t know if our chat or public to everyone but kindly delete it if it’s public and let me know how I can send you the image and outline my challenges.
Hello Fraens, hope you good. Want to share the image of my loom with you and request some changes in the rod sizes that could be found at my locality. Also I don’t know if our chat or public to everyone but kindly delete it if it’s public and let me know how I can send you the image and outline my challenges.
Unfortunately, I was unable to reply to the e-mail.
you have some really great ideas for the loom. As I design and build all my machines alongside my full time job, unfortunately my time is very limited. At the moment I am working on a cord knitting machine and I have many plans to develop more machines. For this reason, I won’t be building any more on the loom at the moment. However, I have already constructed some weaving reeds. You can download them here:
Hello Fraens, Thanks for your reponds, I cant find the link though.
However the roller section, i shared a video i wasn’t getting it right upon following all instructions. and also the the insert screw, less information was provided on that. Can you explain to me on how to get those right.


Pingback: Simple 3D-Printed Table Loom for Complex Weavings | Amznusa.com - amznusa
Pingback: Simple 3D-Printed Table Loom for Complex Weavings – Mist Vista
Pingback: Simple 3D-Printed Table Loom For Complex Weavings – misshaly2
Pingback: Simple 3D-Printed Table Loom for Complex Weavings – MSI Net, Inc. & mCloudServ
Pingback: Simple 3D-Printed Table Loom for Complex Weavings – The Latest News!
Pingback: Simple 3D-Printed Table Loom for Complex Weavings | 3d print ......errori ed esperienze,
Pingback: Simple 3D-Printed Table Loom for Complex Weavings [Hackaday] – Up My Tech
Hello There,
I stumbled upon your YouTube video on 3D-printed table looms, suggested by Google on my home feed. I run a business calledHinkro Kente, a locally made bespoke kente weaving business in Ghana, I’m eager to modernize our production process.
Our traditional looms are bulky, occupying valuable space. As I plan to establish a weaving studio in Accra by end of 2024, I’m seeking innovative solutions. Your 3D-printed table loom caught my attention due to its compact size.
I’d love to discuss whether your design can accommodate the type of fabrics we produce. I’d appreciate the opportunity to share images of our traditional looms and explore the possibilities of your design.
Would you be available for a virtual meeting to discuss further?
Looking forward to your response.
Best regards,
Eric Asante
CEO, Hinkro Kente
Hello,
Unfortunately, I was unable to reply to your e-mail. The mail did not go out.
I am very pleased that you like the loom. I have had a look at your site and the type of fabric you make. There seems to be a long tradition of making this type of fabric. Do you have access to a 3D printer? I would suggest you build my loom and test if it is possible. I am planning an extension for the small loom. I want to build a kind of dobby loom. So the current loom should be able to be extended with a unit with which it is possible to weave more complex patterns using a program or punch card.
I think you would like that.
Kind regards
Franz
Hi Fraens. I have been looking forward to your email. I didn’t know you had responded to the comment. Sorry for the late response. However I am on whatsapp, you can send me a message at +233248167944.
Now to respond to your message, I do not have access to a 3d printer. I do not mind if you print the parts and ship to me here in Ghana. I have friends in Germany who can assist and ensure i get them.
I am also interested in your motorised / powered loom, If i get your last statement, you are producing a loom that can weave based on a command from a computer? that will be great.
I would definitely like that.
I wish we can communicate through any medium for prompt response. So let me know your preference.
Thank you.
Eric Asante.
Hello, I only sell digital files. Unfortunately I can’t supply you with a finished one. Sorry about that. Regarding a computerized loom, I have not yet constructed anything. Maybe this will be a project in the future. I have some ideas.
Yours sincerely
Alright.
In that case, I will get the digital file, nevertheless I love the result of this particular loom as compared to the powered loom. However I think the powered loom would can be very handy. My humble request, can you engineer this into a powered loom for me?
Hello, developing an automatic loom takes hundreds of hours of design work. If I ever find the time, I will do it.
With kind regards
Hello Fraens,
Wanted to know if the file is idle for a standard 220 x 220 x 250 3D Printer. because it appears the vertical side panel and winding comb are way too big?
This is from the 3D printer guy.
Yes, you can. The side panel is then printed diagonally.
Printer guy says it still cant fit the printer area even when changed to diagonal. So if you can help in recommending on how to make it fit. If not kindly break the part into two so he print them separately and later join together.
Thank you.
Hello! I’ve just purchased and downloaded the files from Cults3D, but unfortunately I’m getting told that the Table Loom.zip file is invalid. It turned out it isn’t a zip file at all, but a 7z file. It would be helpful to mention that, or change the extension.
Hello Fraens, hope you good. Want to share the image of my loom with you and request some changes in the rod sizes that could be found at my locality. Also I don’t know if our chat or public to everyone but kindly delete it if it’s public and let me know how I can send you the image and outline my challenges.
Hello Fraens, hope you good. Want to share the image of my loom with you and request some changes in the rod sizes that could be found at my locality. Also I don’t know if our chat or public to everyone but kindly delete it if it’s public and let me know how I can send you the image and outline my challenges.
Hello, is there any means I can reach out for prompt response?
Hello, please send me an e-mail: FraensEngineering@gmx.at
Hello Eric,
Unfortunately, I was unable to reply to the e-mail.
you have some really great ideas for the loom. As I design and build all my machines alongside my full time job, unfortunately my time is very limited. At the moment I am working on a cord knitting machine and I have many plans to develop more machines. For this reason, I won’t be building any more on the loom at the moment. However, I have already constructed some weaving reeds. You can download them here:
I hope this helps you a little.
Kind regards
Franz
Hello Fraens, Thanks for your reponds, I cant find the link though.
However the roller section, i shared a video i wasn’t getting it right upon following all instructions. and also the the insert screw, less information was provided on that. Can you explain to me on how to get those right.
Thank you
Hello, here are the reeds: https://drive.google.com/drive/folders/1jGsI2URxOQBUVg_n2kVsg70oX4LeVzQ2?usp=sharing