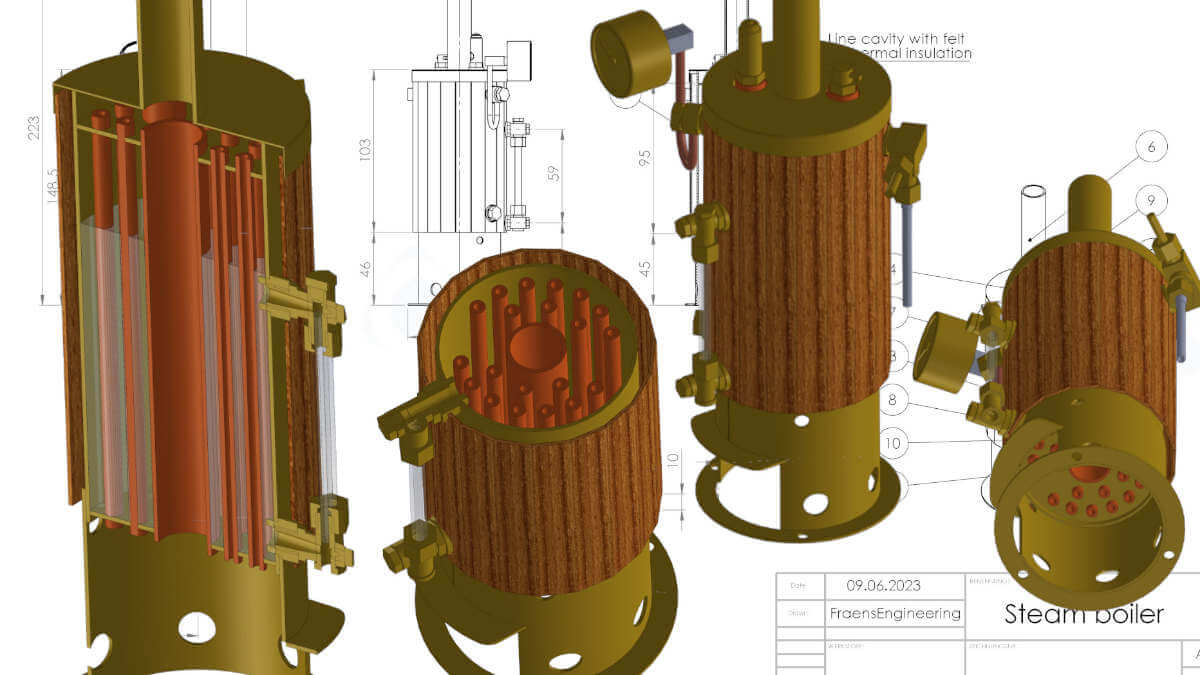
Here I present my model steam boiler with a filling volume of 130ml. The steam boiler is suitable for very small steam engines. Built the boiler mainly from brass. It is very important that all Tiele is soldered with 55% silver braze.
The boiler
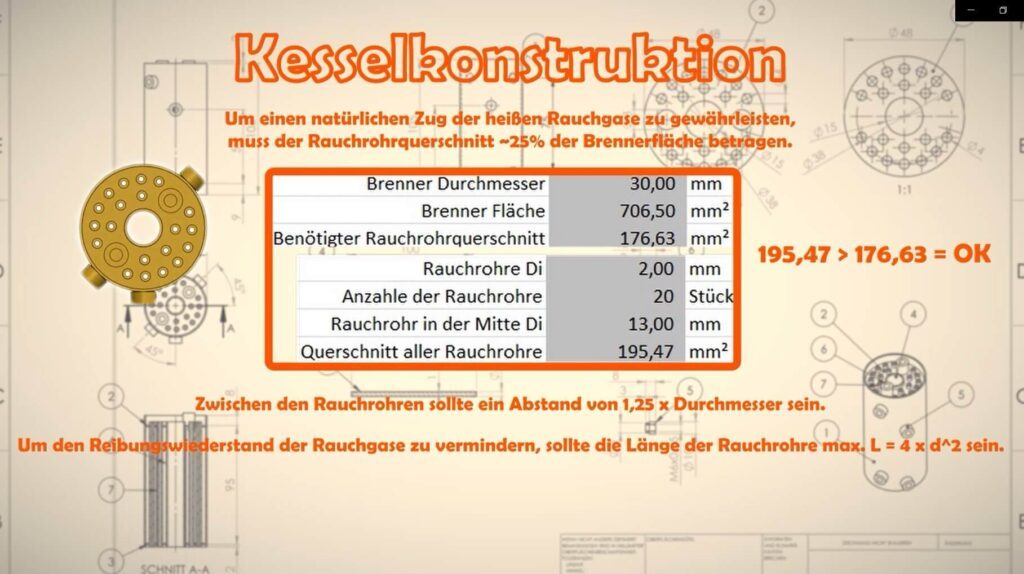
When designing a steam boiler, there are some clearances that need to be considered. To ensure a natural draft of the hot flue gases, the cross-section of the flue pipe must be ~25% of the burner area. That is, for a burner of 30mm diameter, this results in an area of 706.5mm². The required flue pipe cross-section is therefore 176.6mm². 20 smoke tubes with an inner diameter of 2mm and one tube with an inner diameter of 13mm are used in the center. This results in a total area of 195.5mm². The existing smoke tube area is therefore larger than the required one. So there should be no problem with the exhaust of the hot gases. A steam boiler is a pressure vessel and not a toy. It is therefore important that the boiler is designed to withstand heat and pressure. For this reason, there is a rule of thumb that the distance between the smoke tubes should be 1.25x the tube diameter. To reduce the frictional resistance of the flue gases, the length of the smoke tubes should be maximum L=4xd².
These are the basic requirements of a model steam boiler. I did not make them up myself, but took them from a book.
CAUTION: I assume no responsibility for any damage resulting from the construction of this boiler. The information provided is purely illustrative and reflects my personal approach to boiler construction. Any imitation is at your own risk.
Dimensions of the boiler construction
The boiler tube with a diameter of 50mm and the boiler bottoms are made of 1mm brass sheet. The drilling of the holes in the boiler tube is done by step drill. The boiler bottom and the boiler top are turned out with my lathe, an Emco Compact 5.
Turning out the bottom of the boiler
Drilling the holes in the boiler tube
The soldering is done with 55% silver solder. Silver solder is not quite cheap. However, it is very important not to save here. Even if some manufacturers solder their boilers with soft solder, this is not a good idea for a boiler that is heated with gas.
When brazing, it is important to bring the entire boiler to the same temperature to avoid temperature stresses. I braze the entire boiler with a Rothenberger Multigas 300 gas cylinder. This brings enough energy to bring the small boiler to temperature.
First, the inner smoke tube is soldered in place. The distance is adjusted exactly by means of threaded rods. Then the boiler is cleaned and the remaining smoke tubes, cover and boiler tube are assembled and soldered.
Brazing of the inner smoke pipe
Assembly of all smoke pipes
Finally, the threaded nipples for the boiler fittings are soldered in place. These were fixed by means of sheet metal and wire in order not to slip during soldering.
When everything has finally been soldered, the most important part comes: the leak test. Since the boiler is operated at about 1.5-2bar, the leak test should take place at about 6bar. Please do not use compressed air for the test. This can be very dangerous if the boiler bursts. Only water pressure should be used for the leak test. Close all openings, fill the vessel with water and apply pressure. If the pressure lasts for a few hours, the boiler is tight. If the pressure drops, look for a leak and re-solder. The picture shows how I pressurize the boiler with compressed air. This should not be done.
Soldering the boiler nipples
Pressure check of the model steam boiler
What happens in the event of a leak in the steam boiler
What happens if the boiler leaks while it is being heated? Water evaporates at 100°C. At a pressure of 2bar water evaporates only at 120°C. Now imagine what happens in case of a leak: The water in the boiler has 120°C -> suddenly the pressure drops to say 1.5bar -> the temperature is still 120°C only water evaporates at 1.5bar already at 116.5°C -> so suddenly a large amount of steam is generated -> but steam needs a much larger volume than the water -> !!!!!!!BOOM!!!!!!!
You certainly don’t want a hole in the boiler. So work carefully!
The firehouse
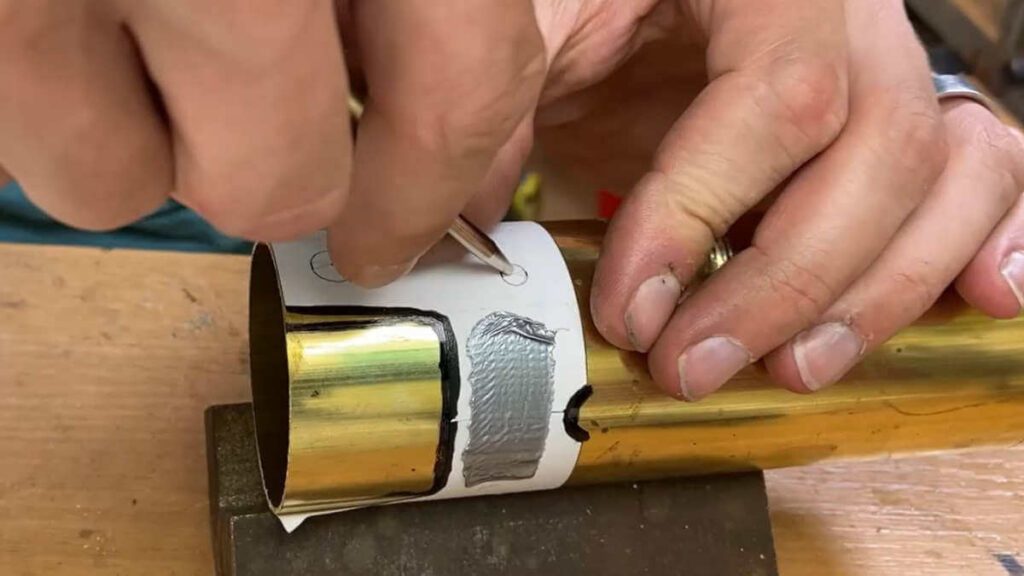
The firebox is, as the name suggests, the part of the model boiler in which the burner is placed. I printed the holes and cutouts on a paper and glued it to the tube. This way I can punch and drill the holes at exactly the right positions. To ensure that the firebox fits over the 50mm pipe of the boiler, I have slotted it and soldered a narrow piece in and then sanded it down evenly. I soldered the firebox with high temperature soft solder because it is not so high temperature.
Center punching of the fire house
Finished soldered fire house
The chimney
Soldering the chimney with silver solder
The construction of the chimney is relatively simple. The semicircular cover was crimped around a wood. It is important to keep the brass glowing soft and quenching it. You have to repeat this process again and again, then it works.
Completed chimney
Thermal insulation and boiler blanking
Thermal insulation of the model steam boiler is very important. I have accomplished this by means of merino felt. Of course, any other felt can be used. The felt should be a few millimeters thick to fulfill its function well.
The boiler covering was made with real wood veneer. The veneer had a thickness of about 3mm. The veneer pieces were fastened with a brass strap.
Thermal insulation by means of merino felt
Boiler facing with wood veneer
Here the finished blanked model boiler:
Boiler blanking
Fittings of the model steam boiler
The fittings are components without which no boiler can work. They serve several purposes, all of which are designed to ensure the safe and efficient operation of the boiler. They occupy a large part of the construction time because you need a lot of very small parts. I will now describe all the fittings in turn and explain their function.
Main shut-off valve
The main shut-off valve serves the purpose of removing the steam and shutting off the main steam pipe. To ensure the steam from the boiler as possible without water, a copper tube was provided with small 1mm holes. To make the valve tight, a pointed cone of 60° was turned on the valve needle. This pointed cone seals on an edge in the body of the valve.
Turning the valve needle
Finished main shut-off valve
Overpressure valve
The overpressure valve is an indispensable component on any pressure vessel, especially a steam boiler. It consists of a few components and contributes significantly to increasing safety. Particularly noteworthy is the use of a so-called „Grafi-sil“ valve ball, which is made of a special silicone rubber. The special feature is that this ball adapts itself somewhat to the valve seat. This maintains the seal even if the seat does not fit 100% perfectly. The pressure valve is set to 3bar.
Overpressure valve components
Setting the maximum pressure
Water level gauge
The „water level gauge“ is a safety-relevant component. It has the task of watching the water level in the boiler. It is of great importance never to let a boiler run completely empty, otherwise the temperature can rise uncontrollably. In this case, the regulating effect of the steam release, which dissipates heat, would no longer exist. The water level glass consists of a glass tube with a diameter of 4 mm. To bring it to the right length, it was ground all around with a Dremel and a diamond disk and then broken.
Milling the water level gauge
Some impressions of the model steam boiler
You can download the building plan here:
You will get the following digital files:
All drawings needed for construction in .pdf and .dxf format.
The complete 3D model of the Steam boiler in .step format.
A parts list of all required parts (without pressure gauge and glass tube).
WHY??? Admittedly, the idea of constructing a cigarette stuffing machine may sound rather special. The inspiration for it came to me during my wanderings through…